WhiteCat ESP32 N1
I do not do reviews usually, but I sometimes do exceptions. In this case, it's worth doing it, due to 4 main reasons:
- It's a software & hardware open source project
- It's local (local to me, that's it)
- It's led by two good friends
- It's related to LoRa and The Things Network
- It's awesome!
OK, they were actually 5 reasons, but the last one just slipped in.
The WhiteCat ESP32 N1 Board
The WhiteCat ESP32 N1 Board is a green board in a long-ish form factor, longer than the LoPy or the Chinese ESP32-based LoRa boards. This is probably due to the fact that it is not as packed as those and it also sports some features the others lack.

The Whitecat project is sponsored by CSS Iberica and the Citilab, a Living Lab in Cornellà, near Barcelona.
Good old friends (already)
No, I'm not talking about Miguel Ferrera and Jaume Olivé, the tech heads behind the WhiteCat project. I'm talking about ESP32 and RFM95. These two you might have seen them in several LoRa boards and they team up pretty well. Actually, there's little more you need to have a working LoRa/LoRaWAN compatible board with enough power to fulfill your darkest desires.
No USB. Didn't you say it was a dev board?
No, I didn't. But it certainly looks like a dev board. Actually, I was talking to Jaume the other day and they are still unsure about the form factor and I can see why.
It lacks some things to be a standalone dev board (like a USB connection) but at the same time, it is not a production board (too large, no SMD option). On the other hand, it does have reset and flash buttons, like a real dev board, and at the same time, uFL connectors like you would expect in a production board…
Don't forget the antennas, wait…
You already know what happens when you trigger a message at full power and there is no load (antenna) attached, right? All those mW bounce back to your precious electronics and start behaving like Attila the Hun, burning everything on the way. “The grass did not grow where Attila had passed”. Well, if you didn't know, now you do.
The N1 has uFL connectors for external antennas but it also has onboard ceramic ones. Both for the WiFi and the LoRa module. It's a curious setup as I have always thought it is not a good idea to have two antennas attached to the same trace. But I'm not an RF engineer.

Then there is this thing about the uFL connectors. They use very little PCB space and they are very useful when using case mounted antennas. But those connectors are tiny! And they are not meant to be used over and over for more than a few tens of times. So be careful.
Schizophrenic board
So it's kind of a schizophrenic board. I have to tell you I do like the board. It feels good. I do not like over-populated boards where you can't click a button without touching a number of passives at the same time. I think going one-side only is a good choice. I also like the onboard antennas, forgetting about the antenna is a major issue when doing workshops. I'm not sure about the uFL connectors. I would probably go without the WiFi one. But I really miss an onboard USB with a USB-UART chip.
Even thou I strongly recommend to get the devkit (see below) it shouldn't be necessary to have another board (the popular FTDI boards, although most of them do not use FTDI chips anymore) to use the WhiteCat N1. It might be OK for makers and other species but it is not when doing workshops or at school. But again: get the devkit :)
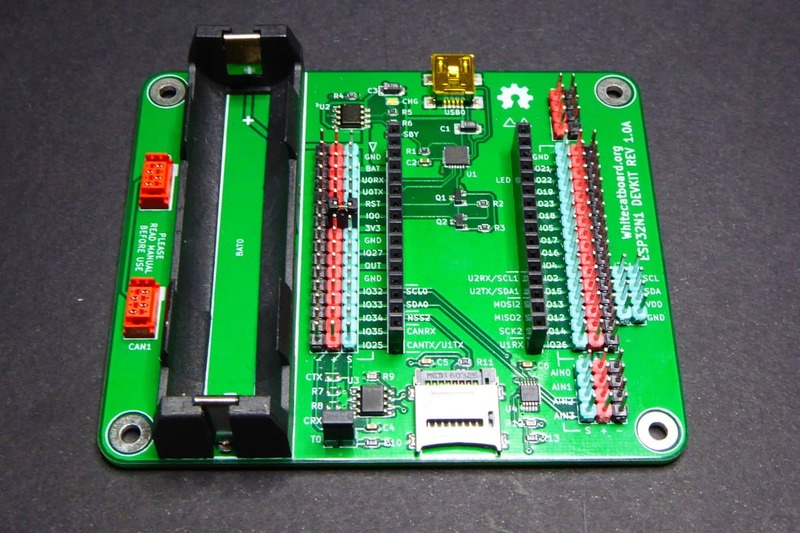
A very interesting development kit
If the N1 board is a solid but standard LoRa board, the guys at WhiteCat decided to design a carrier board for it with convenient headers to connect anything you want, as well as some specific ones for I2C, analog inputs or CAN bus.
Here I will focus on some of the features of the carrier board, you can read more in the Whitecat N1 DEVKIT user manual (only available in Spanish at the moment).
Flash it!
Yes. Here you have it. A CP2104 [datasheet, PDF] USB to UART bridge by Silicon Labs. This is all you need to connect your N1 to your computer to load the firmware or the scripts from the browser IDE and get debug messages.
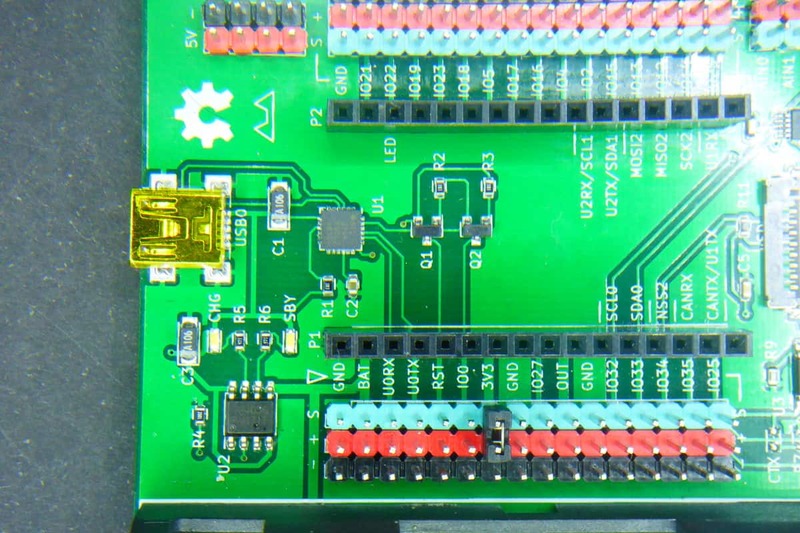
It teams with a miniUSB** jack**. I guess they will be around for some more time yet. One thing about miniUSB jacks is that they are big enough so you get the right orientation on the first try. Much better than microUSB.
So much juice for a devkit
You might have noticed in the picture the big battery holder on the carrier board. It is meant to house a 18650 LiPo battery. This is a popular battery pack that is big enough to store up to 3000mAh some of them (be careful with the ones claiming 5000mAh or 9000mAh!!!).
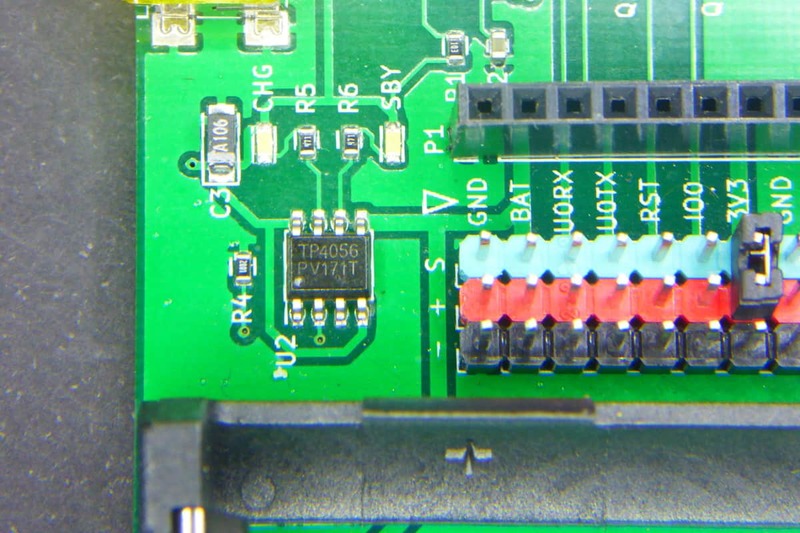
The USB connector is used to charge the LiPo and to power the board. The responsible for the charging process is a TP4056 [datasheet, PDF] Li-Ion battery charger.
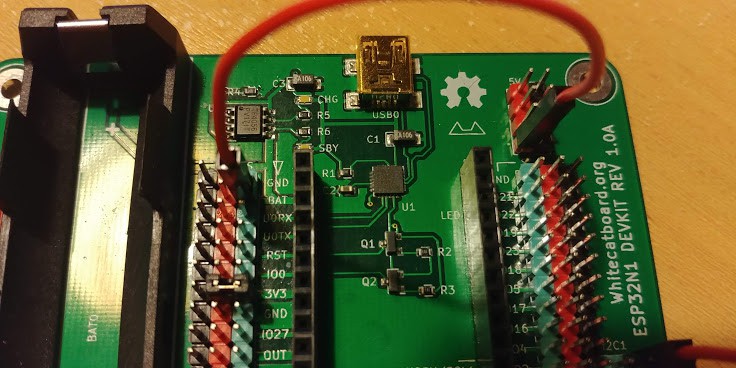
There is one issue here that the guys at WhiteCat should improve: If you don't have a battery in the holder and want to power the board from the USB connector you need to connect a jumper cable from one of the 5V pins near the OSH logo and the BAT pin in the header. The cable must not be present if there is a battery in the holder.
Bypassing the ESP32 drawbacks
The ADC in the ESP32 is a pity. It suffers from non-linearity and a random noise due to the power source. They are currently working on patching it on software using curve maps and noise filters but, if they succeed, it will result in a low depth ADC at best.
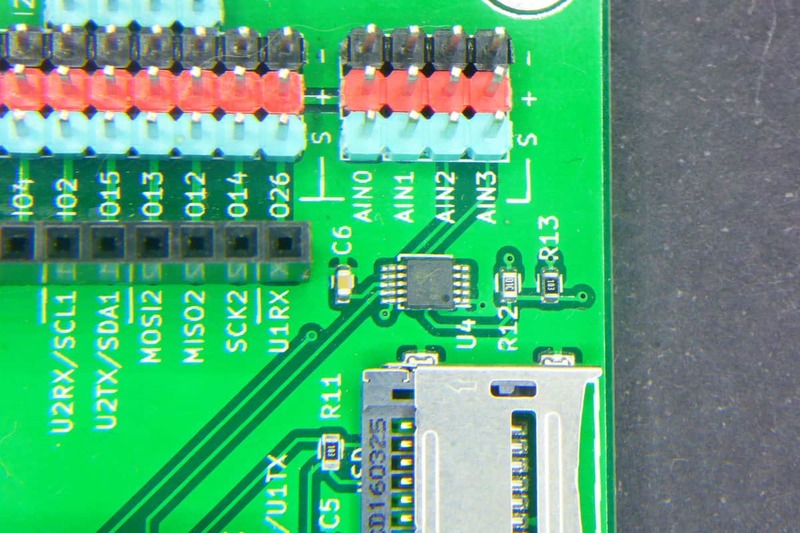
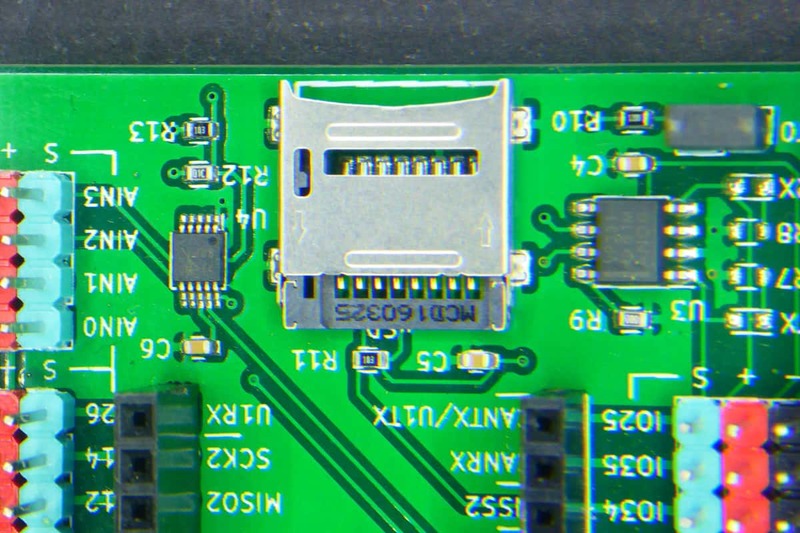
That is by Miguel added an ADS1015 [datasheet, PDF], a 12-bit, 4-channel external ADC with a programmable gain amplifier included. This is a great addon for any ESP32 carrier.
Yes, it CAN
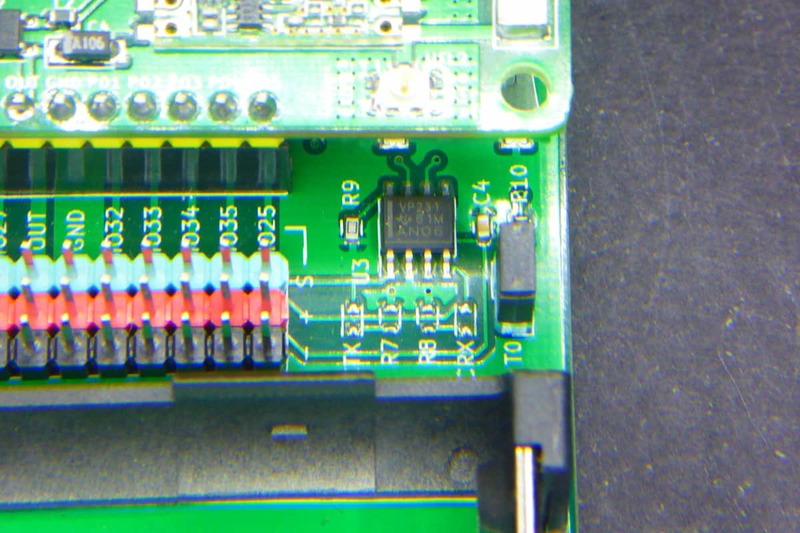
The carrier also ads an SN65HVD231D [datasheet, PDF] CAN bus transceiver and the required jumper to enable a 120Ohm termination resistor.
Sensors & storage
One little fiddling issue I stumbled upon when using the carrier was that the sensor was not being powered. The reason was that there was a missing jumper between the red and green pins in the header 3V3 pin. I don't know why but apparently you have to explicitly connect the power rail in the carrier either to 3V3 or (the other possible option) to BAT.
Being an IoT board you will probably want to send the data from your sensors right away. WiFi, LoRa, CANbus,… you have many options. But no communication is not error free. That is why it is very convenient to have a microSD socket in the carrier.
The key is in the software
Since both the ESP32 and the RFM95 are “good old friends” we can pretty much load any firmware we would like on the WhiteCat N1. But don't do it. Believe me: you want to play with the original firmware that the guys from WhiteCat have developed for their boards.
A browser-based IDE
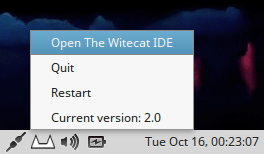
The first thing you have to know is that the IDE only works with Chrome and you will need to have an agent installed to interface between the Chrome app and the board. That means (the second thing you have to know) that you have to have a compatible board connected to use the IDE.
Installing the agent is easy, just follow the instructions in the agent repository wiki. Once installed, run it and select the “Open The Witecat(sic) IDE”. It will open a web page so Chrome must be your predefined browser. If it's not you can also open the site manually: https://ide.whitecatboard.org.
From here on there is a lot to explore. Let me just point you a couple of things.
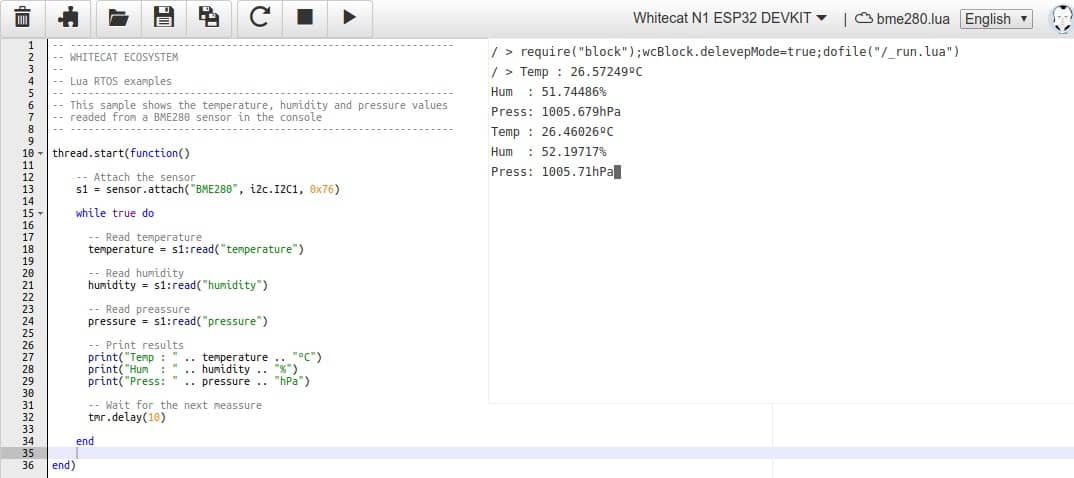
Meet Lua
From the online IDE you can code your “sketch” using Lua. Lua is a scripting language targetted to embedded applications. It can be a bit confusing at first since its naturally asynchronous and thread based.
The language is powered with a lot of custom commands and libraries to use common interfaces (I2C, UART, CAN, SPI,…), sensors (BME280, DHT22,…) and actuators (relays, displays,…). It also provides an API for WiFi, MQTT, LoRaWan or the option to configure an SSH server or a VPN client.
You can read all the documentation about the WhiteCat Lua RTOS and the available modules in the Lua-RTOS-ESP32 wiki.
Wow! IoT with Blocky
If Lua is targetted to somewhat experimented developers, the other language option provided by the IDE is targetted to kids. What about programming an IoT device using a blocks language. Here you have it.
The interface is based on Google's Blockly, enhanced, again, with different modules to manage WiFi, LoRa or MQTT connections, use sensors or different protocols. You can even see the corresponding Lua code by clicking the “eye” icon. unfortunately is a read-only view, you cannot change the code in Lua and go back to Blockly.
The sketch below, for instance, connects to the The Things Network LoRaWan network and sends temperature, humidity and pressure from a BME280 sensor every 120 seconds.
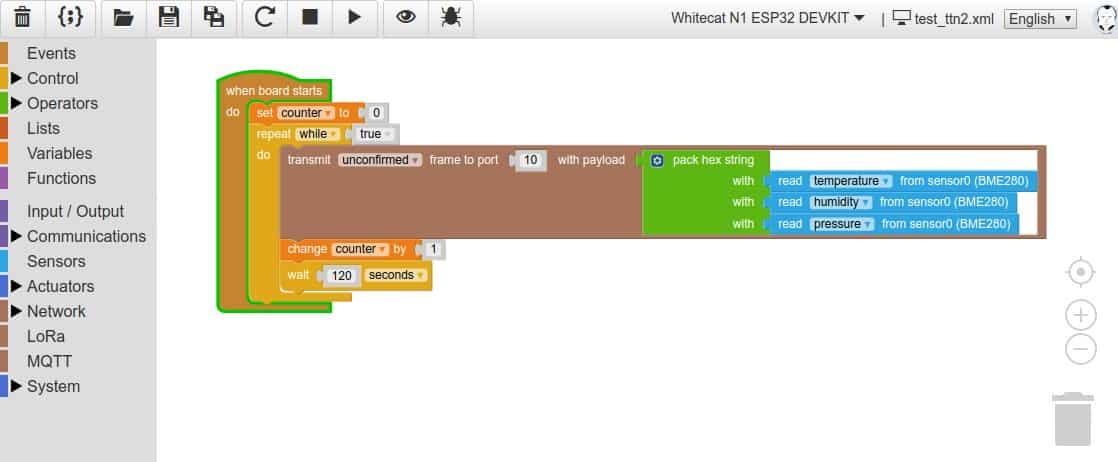
There is a Lua API to pack and unpack the messages in a binary format suitable for LoRaWan messages. The “pack hex string” block in the picture above is translated into something like:
pack.pack(_getsensor0_temperature(), _getsensor0_humidity(), _getsensor0_pressure())
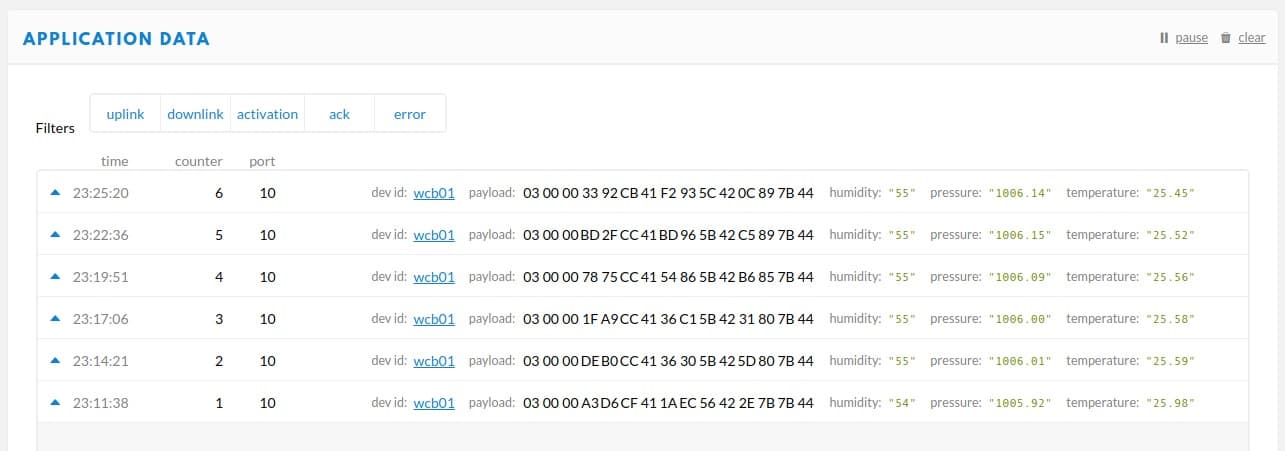
To unpack this blob in the TTN console you can use this decoder routine:
function toNumber(bytes) {
var bits = (bytes[3] << 24) | (bytes[2] << 16) | (bytes[1] << 8) | (bytes[0]); var sign = ((bits >> 31) === 0) ? 1.0 : -1.0;
var e = ((bits >> 23) & 0xff);
var m = (e === 0) ? (bits & 0x7fffff) << 1 : (bits & 0x7fffff) | 0x800000; var f = sign * m * Math.pow(2, e - 150); return f; } function toInteger(bytes, len) { var out = 0; for (var i=len-1; i>=0; i--) {
out = (out << 8) + bytes[i]; } return out; } function toString(bytes) { var s = ""; var i = 0; while (0 !== bytes[i]) { s = s + String.fromCharCode(bytes[i]); i++; } return s; } function toBool(bytes) { return (1 === bytes[0]); } function unpack(bytes) { // array to hold values var data = []; // first byte holds the number of elements var size = bytes[0]; // get data types var types = []; var count = 1; do { var type = bytes[count]; types.push(type >> 4);
types.push(type & 0x0F);
count++;
} while (types.length < size);
types = types.slice(0, size);
// decode data
for (var i=0; i<size; i++) {
var type = types[i];
if (0 === type) {
data.push(toNumber(bytes.slice(count,count+4)));
count += 4;
} else if (1 === type) {
data.push(toInteger(bytes.slice(count,count+4), 4));
count += 4;
} else if (5 === type) {
data.push(toInteger(bytes.slice(count,count+2), 2));
count += 2;
} else if (6 === type) {
data.push(toInteger(bytes.slice(count,count+1), 1));
count += 1;
} else if (3 === type) {
data.push(toBool(bytes.slice(count,count+1)));
count += 1;
} else if (4 === type) {
var s = toString(bytes.slice(count));
data.push(s);
count += (s.length + 1);
}
}
return data;
}
// ----------------------------------------------------
function Decoder(bytes, port) {
var decoded = {};
// BME280 @ WhiteCat
if (port == 10) {
var data = unpack(bytes);
decoded.temperature = data[0].toFixed(2);
decoded.humidity = data[1].toFixed(0);
decoded.pressure = data[2].toFixed(2);
}
return decoded;
}
Yeah, it's libre, so why not…
… load the Lua RTOS implementation by WhiteCat on other boards? Sure you can.
There is just one gitch. Since Lua is an interpreted language you will need to implement the proper “handlers” for your board and peripherals. This is more or less like having the right GPIO definitions (like the ones defined in the boards.txt file in the Arduino ecosystem) and the right libraries to use the sensors, protocols, displays,… you will want to use.
So your firmware image will have to have all the required components and then, from the browser IDE you will script your code in Lua using those components. And adding new features to the Blocky-based environment is surely even more involved. Good news is that the RTOS already supports a lot of common sensors and IoT-oriented protocols. And if you are not lucky, there is plenty of code to learn from in the Lua-RTOS-ESP32 repository.
Keep an eye on these guys
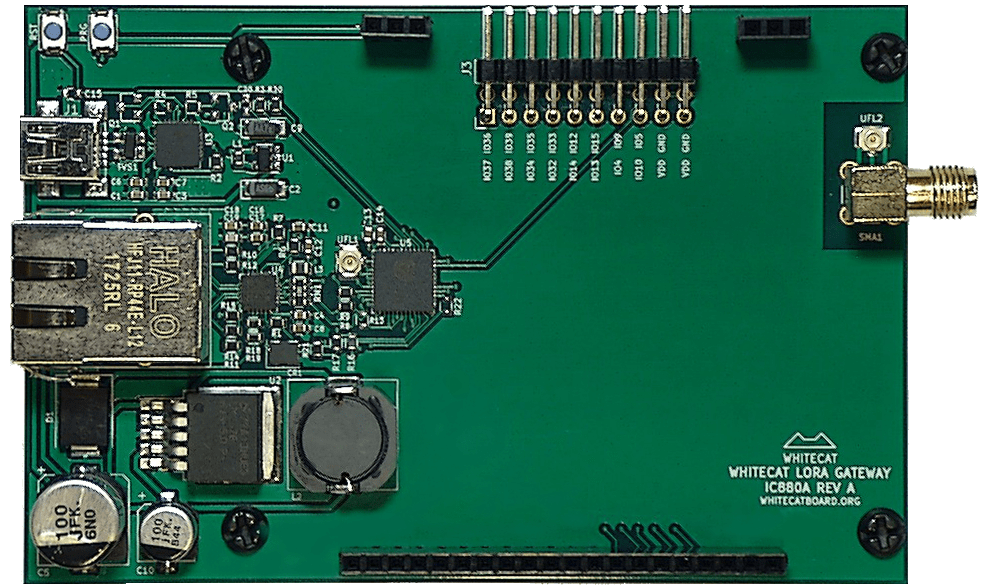
If you should definitely check their current development with the Lua RTOS for ESP32 or the Whitecat ESP32 N1. You won't want to miss their upcoming projects. Just take a look at this: an ESP32-based LoRaWan gateway using the iC880A concentrator board by IMST.
Don't you think it's got potential? I do. Actually, I'm already working on something on the line…
"WhiteCat ESP32 N1" was first posted on 15 October 2018 by Xose Pérez on tinkerman.cat under Analysis and tagged ads1015, blockly, bluetooth, canbus, chrome, citilab, cp2104, cssiberica, esp32, jaume olive, lipo, lora, lorawan, lua, lua-rtos-esp32, microsd, miguel ferrera, n1, rfm95, rtos, sn65hvd231d, the tings network, tp4056, ttn, whitecat, wifi.