Low power weather station with BME280 and Moteino
A few weeks ago I wrote about my new door monitor. It was the first step towards migrating my XBee based wireless sensors network to RFM69 radios using Moteino platform by LowPowerLab. I was truly impressed by the low power consumption so I committed myself to keep on working with them.
Coincidentally Felix Russo, the guy behind LowPowerLab, released the new version of it's Weather Shield for Moteino. So it was time to update (or completely revamp) my trusty Arduino FIO based weather station… and last week I received a parcel from LowPowerLab with a pair of shields to play with: the new WeatherShield R2 and the PowerShield R3. They are both compatible with the Moteino (off course).
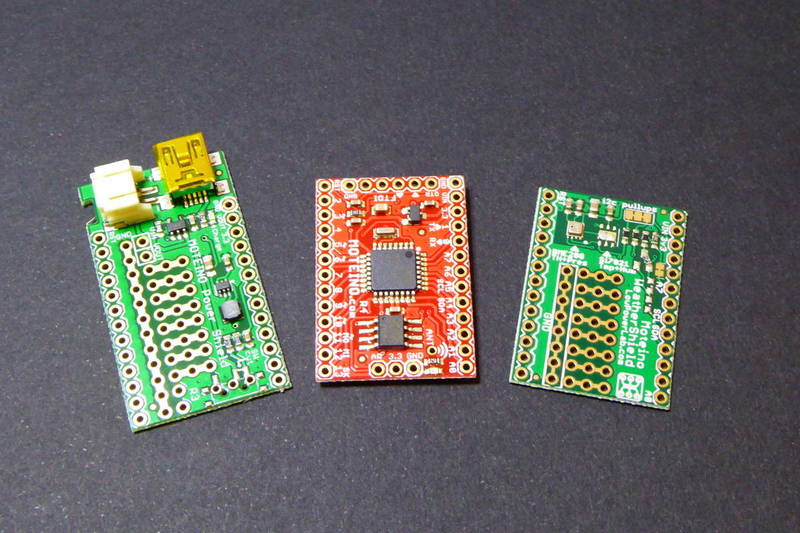
WeatherShield R2 for Moteino
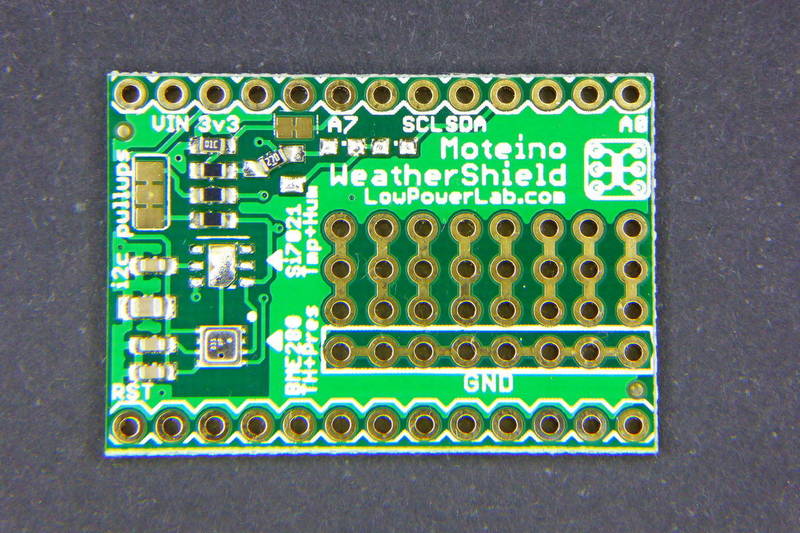
The Moteino WeatherShield R2 uses the new Bosch BME280 sensor, the heir of the BMP085, BMP180 and BMP183 dynasty. It provides temperature, humidity and pressure measurement in a very small package, with improved accuracy and really fast acquisition times. It's that tiny silver square on the bottom left of the picture above. But, if the sensor is so small: what do you need the rest of the shield for?
Well, you basically have a solder jumper for the on-board pull-ups for the I2C buses (they are connected by default), a voltage divider to monitor battery status on pin A7 (also with a solder jumper connected by default) and a SI7021 footprint as a cheaper alternative (USD 3-3.5 against the USD11 of the BME280 when bought in units). The rest of the board is a prototyping zone for your own addons.
You may have noticed an angled resistor in the pic above. Originally Felix designed the board to use a mosfet to “enable” the battery reading feature hence saving some microamps. But on the final board it has been removed and bypassed with a 27Ohm resistor (the angled one). The pads are still there so anyone can add the mosfet and the resistors to A3. Bad news is that this voltage divider actually evaporates a few mW…
Code for this project is released as **free open software **and can be checked out at my Moteino Weather Station repository on Bitbucket.
Good night Moteino, sleep tight
I like to start programming with a minimum working program and add features on top of it. So the first sketch I uploaded to the Moteino was just initializing the radio and sleep it immediately and then do the same with the controller using RocketScream LowPower library.
I then grabbed my multimeter and the uCurrent Gold and checked the consumption: 1.9mA. What? I was expecting something around the 15uA. There was something wrong. Mind that I didn't have anything plugged to the board yet. There was only the ATmega, the RFM69 radio and the SPI Flash IC… wait!
OK, it's not the first time that this happens to me so I better write it down so I don't forget next time:
Put the flash IC to sleep too!!
I then added this code to the initialization routine:
if (flash.initialize()) {
    flash.sleep();
}
And read my multimeter again: 14.3uA. Much better!
Setting the BME280 to sleep
Next I moved to the WeatherShield. I had no experience with the BME280 sensor but it's specs looked awesome. I relied on the PlatformIO library manager to check for available libraries:
$ pio lib search BME280
Found 3 libraries:

[ ID  ] Name             Compatibility         "Authors": Description
-----------------------------------------------------------------------------------------------------------------------------------------------------------------------------------------------------
[ 901 ] BME280           arduino, atmelavr, atmelsam, espressif8266, intel_arc32, microchippic32, nordicnrf51, teensy, timsp430 "Tyler Glenn": Provides a library for reading and interpreting Bosch BME280 environmental sensor data over I2C.
[ 166 ] Adafruit BME280 Library arduino, atmelavr     "Adafruit Industries": Arduino library for BME280 humidity and pressure sensors
[ 684 ] SparkFun BME280  arduino, atmelavr, atmelsam, espressif8266, intel_arc32, microchippic32, nordicnrf51, teensy, timsp430 "Marshall Taylor, SparkFun Electronics": A library to drive the Bosch BME280 Altimeter and Pressure sensor
I had pretty good experiences with Adafruit's libraries in the past so I installed it first. Loaded the sample sketch and it worked right away without modifications. Good. I then merged the sketch to my original one and checked power consumption again with controller, radio and flash in sleep mode: 714uA. Well, it's not bad but I expected something better. The BME280 can work down to 100nA so there was room for improvement here.
Reading the BME280 datasheet I found out that the sensor has 3 working modes: sleep, forced and normal. In “sleep” mode the sensor does not perform any measurements but the registers are available for reading. In “forced” mode the sensor is forced to perform one reading and then goes back to sleep. And in “normal” mode the sensor performs a reading and then stays in stand by for a certain amount of time before reading again.
It looked like I needed to set my sensor in “forced” mode to control when I wanted it to wake, read the temperature, pressure and humidity, store the values in it's registers and go back to sleep. But the Adafruit library does not provide a method to do that, neither the one by Tyler Glenn. But, even thou the SparkFun library doesn't let you change the mode in-the-fly either, it does expose a method to write to the IC registers directly. So I can do what I want without having to modify a third party library:
void bmeForceRead() {

    // We set the sensor in "forced mode" to force a reading.
    // After the reading the sensor will go back to sleep mode.
    uint8_t value = bme.readRegister(BME280_CTRL_MEAS_REG);
    value = (value & 0xFC) + 0x01;
    bme.writeRegister(BME280_CTRL_MEAS_REG, value);

    // Measurement Time (as per BME280 datasheet section 9.1)
    // T_max(ms) = 1.25
    //  + (2.3 * T_oversampling)
    //  + (2.3 * P_oversampling + 0.575)
    //  + (2.4 * H_oversampling + 0.575)
    //  ~ 9.3ms for current settings
    delay(10);

}
So I just had to call my bmeForceRead method before reading the sensor registers. It sets the sensor in forced mode and waits for the readings to take effect. Timing is calculated based on BME280 datasheet.
Grabbed my uCurrent and multimeter and… 242uA! Good! But it can be better…
Modifying the WeatherShield
So back to the first section in this post I was talking about the missing mosfet and the voltage divider. Do you know how much current flows through a 14k7 voltage divider at 3.3V? Around 224uA.
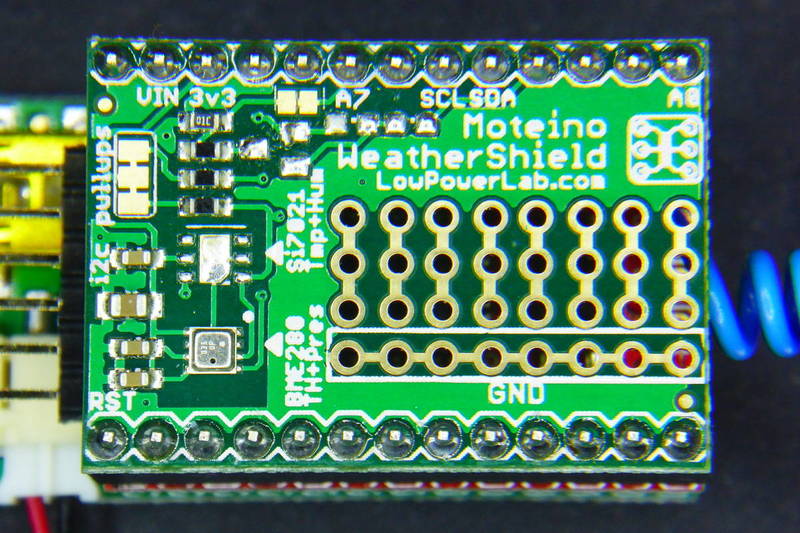
Grabbed the solder iron and removed the 27Ohm resistor in the WeatherShield (the angled one). And since I was not going to use the battery monitor circuit in the shield I cut the solder jumper left to the A7 silkscreen label.
And now…. 13.9uA!! Bingo! Mind that I'm close to the uCurrent error level so 2-3 uA up or down don't really mean anything.
Next I plugged my DSO Nano as I had done with the Door Monitor and captured some screenshots with sending power patterns.
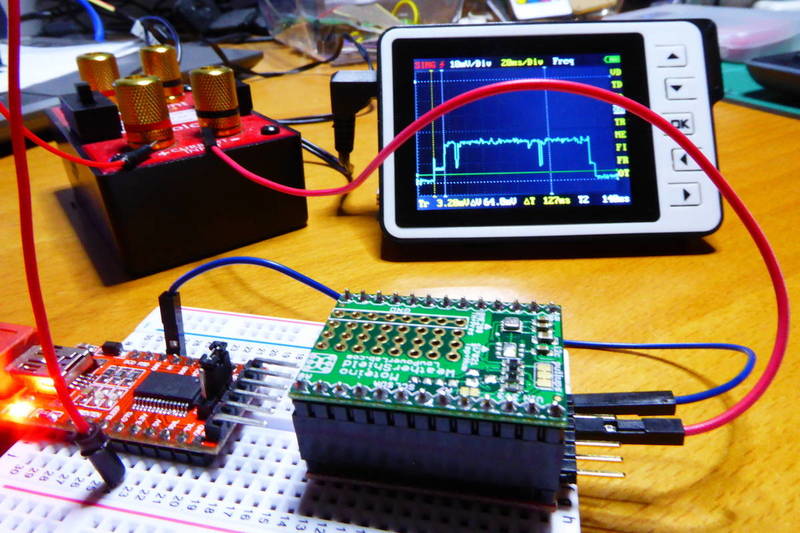
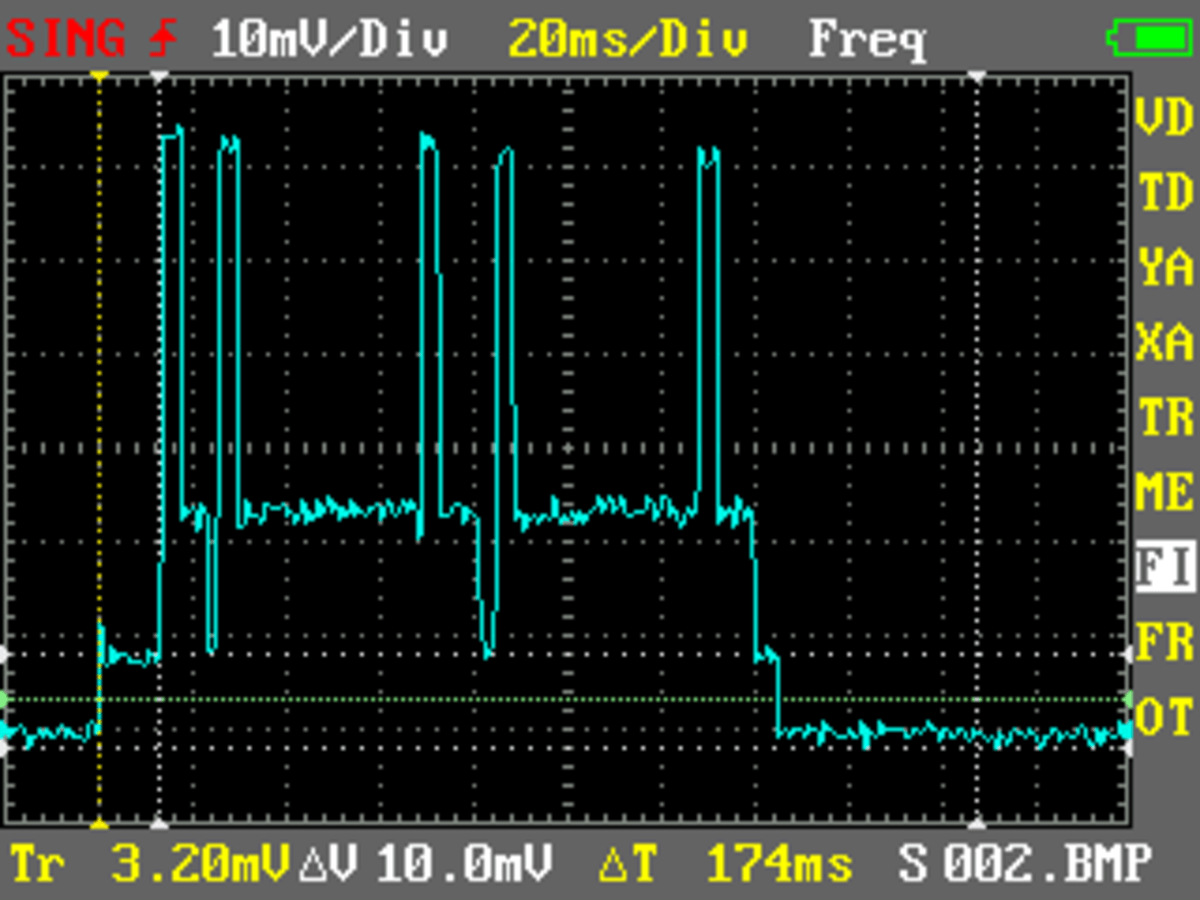
Adding the PowerShield
Last I added the Moteino PowerShield R3 and a small LiPo I had around. The Moteino Sandwich is ready. I also took some measurements with the whole set in sleep mode and it threw 12.2uA. Amazing. I expected a higher value due to the powershield boosting the ~4V of the LiPo to 5V to power the Moteino throught the VIN pin but I guess error in the measures is even higher than that.

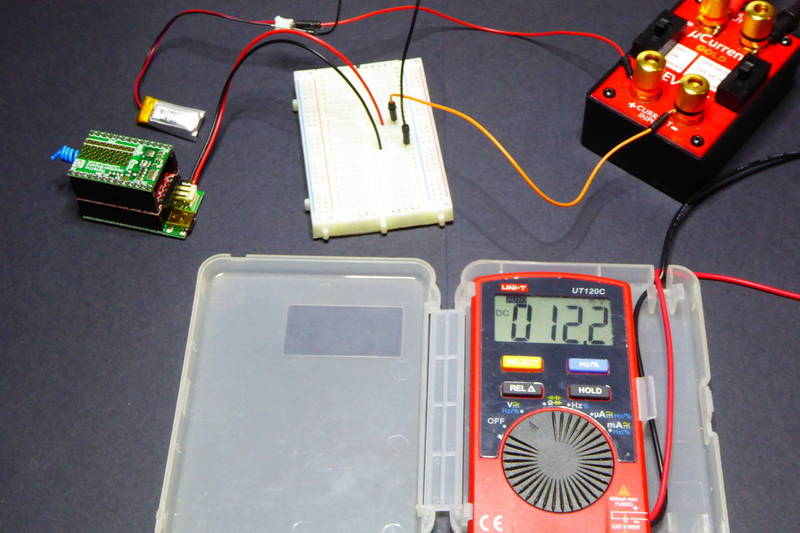
I have to say I'm a bit confused about the PowerShield. It's something in between a LiPo charger and a power supply but it's neither of both. It provides a way to monitor battery voltage through a voltage divider tied to A7 (again). This time thou the resistors are quite heavier and the power drainage is negligible. But it lacks options for power harvesting. I would like to connect a solar panel for instance. I think that's something I'll try to add at some point since my previous weather station had one and has been working flawlessly for 4 years…
Some maths to end with
I like maths.
So very roughly:
| Stage | mA | ms/event | events/5minute | mA*ms/5minute |
|---|---|---|---|---|
| Reading data | 8 | 12 | 1 | 96 |
| Sending burst | 60 | 4 | 3 | 720 |
| Waiting ACK | 23 | 40 | 3 | 2760 |
| Blinking LED | 8 | 5 | 1 | 40 |
| Rest of the 5 minutes | 0.014 | 300000-12-43-403-5 | ~4200 | |
| Total over 5 minutes | ~7814 |
That's 26uA average (7814mA*ms/5minute / 5 / 60000 ms/minute). The little 100mAh LiPo battery would last 5 months!! Add a bulkier 3000mAh and you can forget about it for years. And these numbers are really conservative: ATC would lower burst spikes as the radio adjust the transmitting power to match the expected RSSI and ACK should come faster…
Now I have my new weather station side by side with the old one. Getting to know each other for some days while I think about the solar panel or maybe a couple more sensors and a proper enclosure…
Code for this project is released as **free open software **and can be checked out at my Moteino Weather Station repository on Bitbucket.
"Low power weather station with BME280 and Moteino" was first posted on 09 October 2016 by Xose Pérez on tinkerman.cat under Projects and tagged adafruit, arduino fio, atmega328, battery, bme280, bmp085, bmp180, bmp183, dso nano, flash, lipo, lowpower, lowpowerlab, mosfet, moteino, powershield, rfm69, rssi, si7021, solar panel, sparkfun, ucurrent gold, weathershield, xbee.