Hacking the Sonoff RF Bridge 433
Itead Studio has been releasing interesting gadgets for the Home Automation community based on a low price tag and extreme hackability. You can google “sonoff” (the main brand for Itead Studio home automation devices) to get more than a million hits, including official pages, reviews and lots of hacks. The ubiquitous ESP8266 (or its sibling ESP8285) is the core of all those devices, using WiFi instead of the traditional RF messages, replacing a remote with mobile apps or voice commands. But also, using custom firmware like ESPurna, technologies and solutions like MQTT, Node-RED or Home Assistant. But one of the latests devices from the chinese firm tries to bridge the gap between those two technologies: the Sonoff RF Bridge 433.
Itead Studio was kind enough to send me an engineer sample before holidays but I have had very few time to work on it. I should have written this post a month ago. Anyway you can buy one from the Itead Studio webshop or in the usual online markets looking for Sonoff RF Bridge [Aliexpress].
Out of the box
If you had read me before you might know that I have critisized the eWeLink app. It's not that I didn't like it. I just couldn't make it work. With every new Sonoff device I gave it a chance and the outcome was always the same. Until now. Last month I tried it with the RF Bridge and the 4CH Pro and it worked like charm. Don't know what was wrong. Maybe an uncompatibility with some other service or app in my phone. At some point the problem has been addressed and I could finally test it.
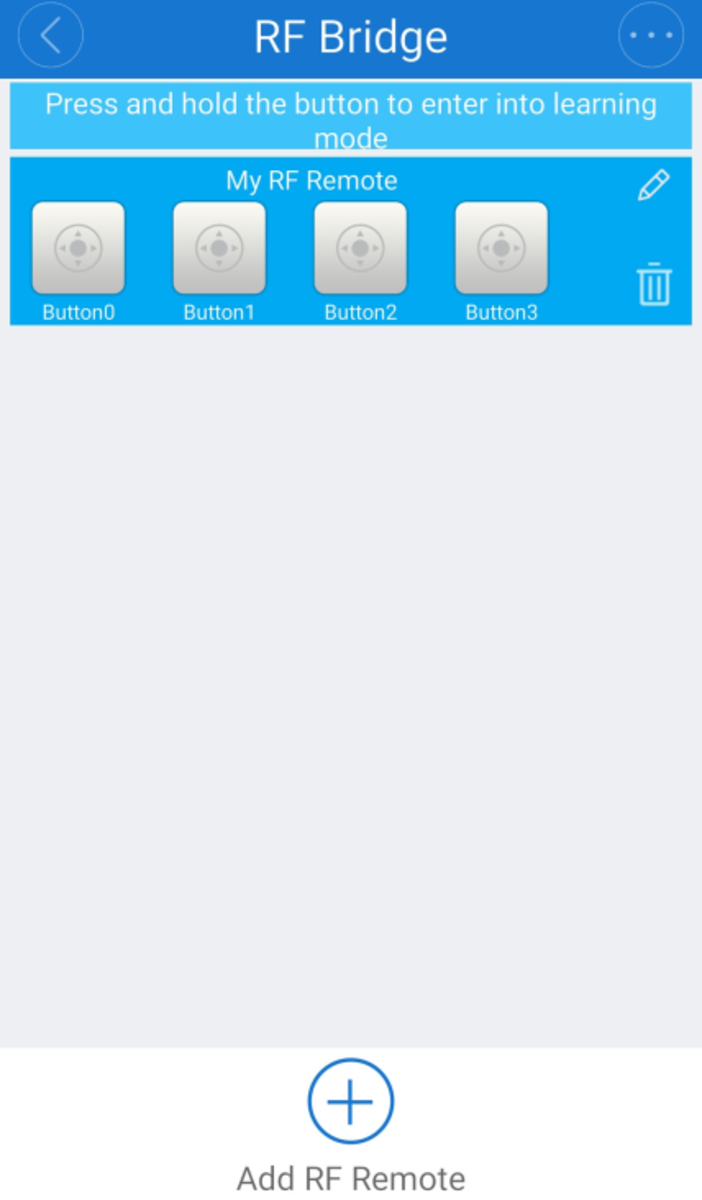
It works, you can discover the device, force pair mode for any of the 4 available buttons and use them. it also work with Alexa and eWeLink custom skill. Nice. But I just don't want to use it. I will not go (I have never gone) much into the app, the user experience, the use cases,… because this is about hacking it with he aim of really own the device and have the freedom to choose what 3rd party services you will use with it, if any at all.
The device
Outside
The Sonoff RF Bridge 433 is a small black box with a microUSB port for power, a recessed reset button and three LEDs for notifications (power, custom and radio). The button is connected to GPIO0 on the ESP8266 so it doubles as flash mode button. In the original firmware it sets the device into “discoverable” mode, so you can use the eWeLink app to discover it.
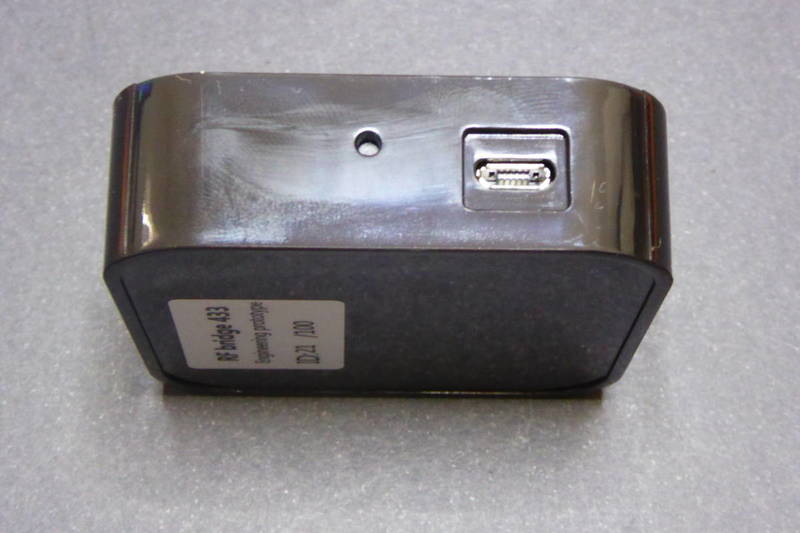

Short section, right. There is really not much more about it. A sticker with a QR linking to the eWeLink user guide.
Inside
Opening the box is quite easy with the help of a couple of plastic opening tools. Inside the box there is a single PCB with all the components.
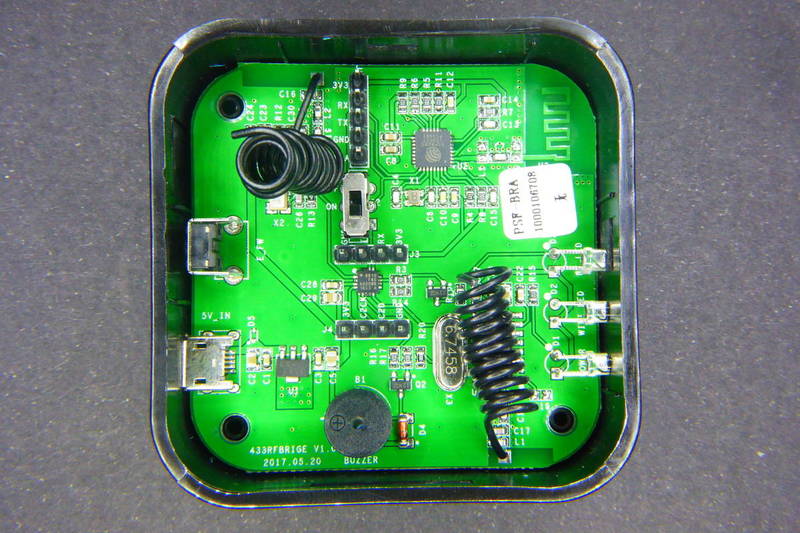
On one of the corners you can spot the PCB WiFi antenna and the ESP8285 (an ESP8266 with a 1Mbyte flash memory embedded) along with the required header to flash it (3V3, RX, TX and GND). You also have access to GPIO2 (labelled SDA) on the same header.

In the center of the board you can see the EFM8BB1. An 8-bit microcontroller by SiLabs that manages the radio communication. This is the same microcontroller IteadStudio has used for the Slampher and the Sonoff RF. Moving the real-time encoding and decoding out of the ESP8285 has benefits since those are very time-picky functionalities that could interfere with the WiFi communications.

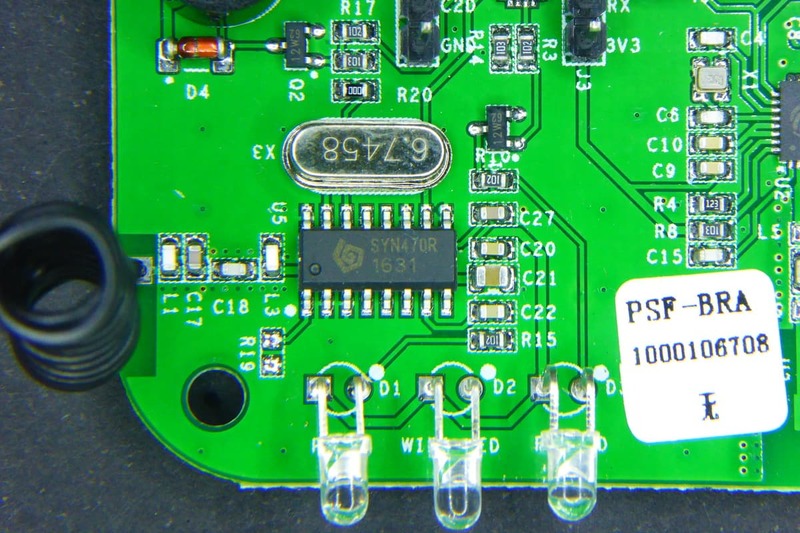
But the EFM8BB1 is not alone. There is a [SYN470R(https://www.birdandgua.net/birdimages/SYN470R-Synoxo.pdf) ASK superhet receiver decoding the messages. You might have also noticed two quarter-wavelength wire antennae, one close to the receiver and the opposite one for transmitting.
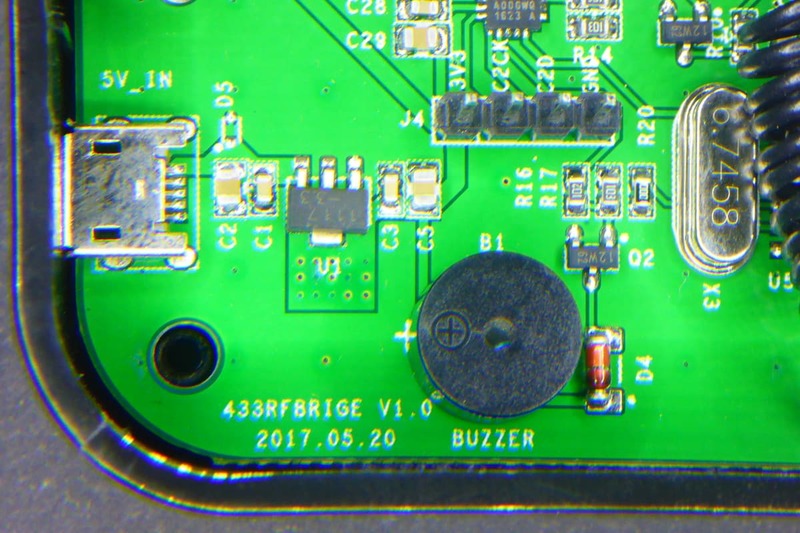
Finally, a SPDT switch that controlls the communications between the ESP8285 and the EFM8BB1. The communication is done via serial (RX and TX) and that could be a problem when trying to flash a new firmware. Moving the switch to the OFF position you effectively disconnect the communication between both microcontrollers.
Enough about the PCB. You can check the schematics for the Sonoff RF Bridge 433 yourself at the IteadStudio wiki.
ESPurna
Flashing it
As we have seen the board has all the connections to allow anyone to flash custom firmware on the ESP8285 (and on the EFM8BB1, but I will focus on the Espressif chip). All you have to do is:
- Connect the ESP8286 header to your USB2UART programmer (RX to TX, TX to RX and GND to GND)
- Place the switch in the OFF position
- Press and hold the reset button
- And power the device either via the microUSB port or via the 3V3 pin on the same programming header
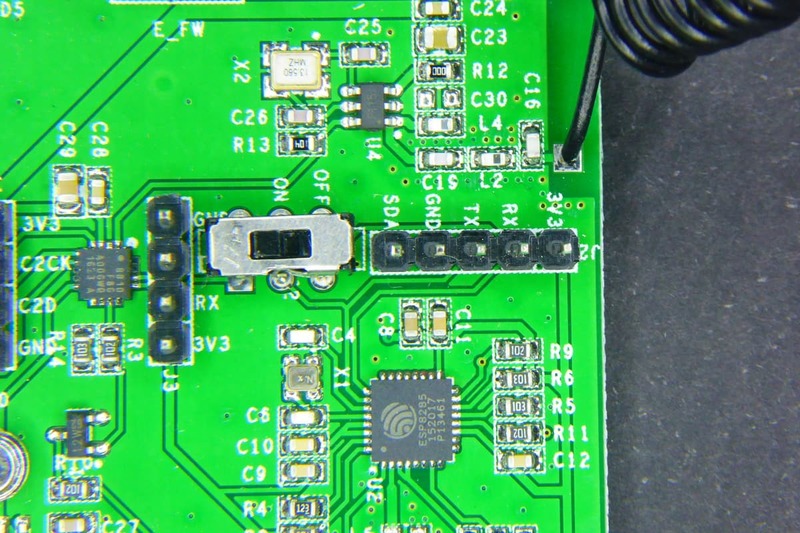
At that moment the ESP8285 will boot into flash mode, ready to get a new firmware. If you are using PlatformIO (recommended), just checkouot the ESPurna repository, browse or open the Atom IDE on the code folder and build and flash the itead-sonoff-rfbridge environment. From the console it would be something like:
pio run -e itead-sonoff-rfbridge -t upload
Done. If you are using Arduino IDE instead check out the instructions from the Arduino IDE page in the ESPurna wiki to configure the environment and flash the board.
Since 1.9.0 ESPurna fully supports Sonoff RF Bridge 433 but the approach the firmware uses is quite different from that on the official app.ç
The ESPurna firmware is released as **free open software **and can be checked out at my Espurna repository on GitHub.
Public API
It turns out that the API between the ESP8285 and the EFM8BB1 is public under the serious name of RF Universal Transceive Module Serial Protocol. The document is spare, has one or two typos and misses some basic information, but it's good enough to interface the EDM8BB1 from you own ESP8285 firmware.
The key points in the API is that:
- You can set the device in “listen mode” which basically beeps the buzzer to provide some user interaction
- Any code the SYN470R decodes the EFM8BB1 will report it to the ESP8285
- The ESP8285 can send raw codes to the EFM8BB1 and it will forward them
So we have a good enough API to work with. The ESP8285 handles the user interaction, stores codes (there is room for more than a 100 different codes in the emulated EEPROM) and commands the 8-bit microcontroller.
From the ESPurna web UI you can manage the stored codes. By default you have 6 ON/OFF pairs but you can change that in the configuration files, anyway it way more than the 4 codes the official app can handle. Once “learnt”, you can use them from the main status page, like you would with any other switch.
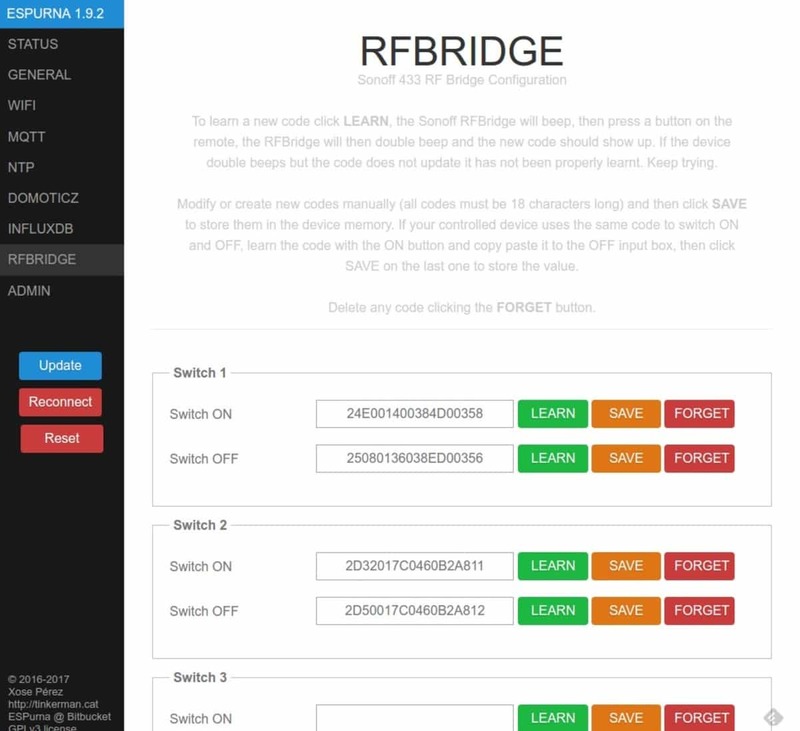

Once you have the codes assigned to a certain “virtual” switch you can manage the from MQTT easily by switching the false “relay” on and off:
mosquitto_pub -t /test/rfbridge/relay/0/set -m 1
or using the REST API so you can do that from outside your home too. Check my post about secure access to your IoT devices from the intenet, also with Google Home.
MQTT power
But the firmware also exposes direct access to the Receive Key and Transmit Key Value entry points. That means you can sniff RF messages from Node-RED, for instance, and send them by simply copy paste the codes. Here you have a screenshot of a fully functional interface for the Sonoff RF Bridge 433 in Node-RED. That's all it takes.
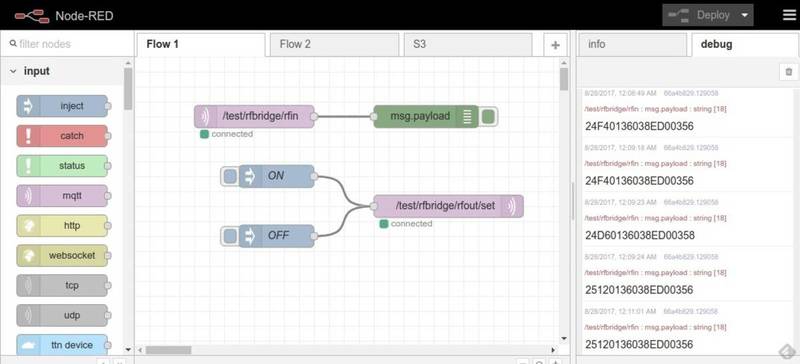
You can sniff and store as many codes as you want or use other apps or services to send them via MQTT. The Sonoff RF Bridge 433 as a true, transparent, MQTT-433MHz-MQTT bridge.
Will it work with any RF device?
I have a couple of old RF switches sets at home. I have used them in the past and time has come to give them a second life. These have slightly different implementations based on the Manchester encoding but since the code does not matter about the message structure itself it shouldn't matter, right?
Well, as it turns out one of the remotes (branded Noru) works flawlessly but with the other one (Avidsen) the RF Bridge struggles to understand the messages and often requires several tries before they got learnt. So what's the difference?
My only guess at the moment is the timing. The code structure is simple:
- Sync time (2 bytes)
- Low level time (2 bytes)
- High level time (2 bytes)
- Data (3 bytes)
So this is what a Noru message looks like: “24E0 0140 0384 D00358”. That means: 9440us sync time, 320us low time and 900us high time. Data is “D00358”, this identifies the button in the remote. The timing is not necessarily strict, but you can see the high time is 3 times longer than the low time and the sync time is 10 times longer than the high time. And the minimum pulse length is around 320us and that's about 3KHz. The SYN470R datasheet talks about a max frequency of 5KHz when in sweeping mode. The pulses in the Avidsen look like being faster than that… but more investigation is needed here.
RF relays
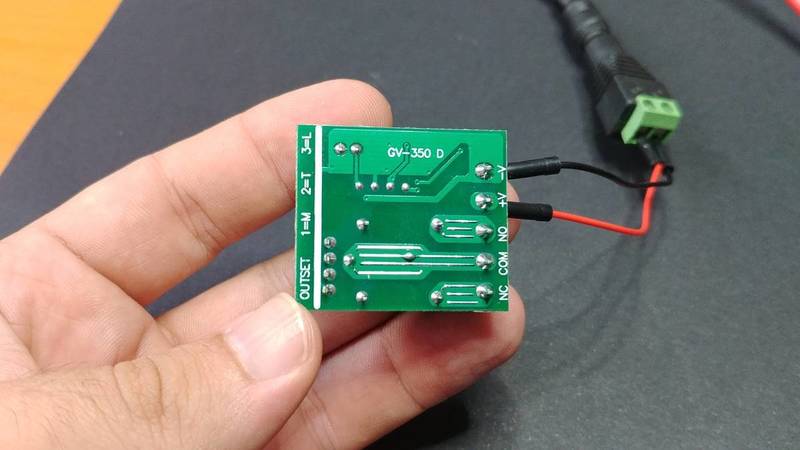
But apart from the Avidesen remotes all the other devices I have tested have been a success. All the RF enabled products by IteadStudio, of course but I have also bought some extremely cheap RF relays to play with.
The ones I bought are 1 channel 433MHz enabled relays [Aliexpress]. You can buy them alone, with a remote, with an enclosure and they come also in multiple channels [Aliexpress]. They work best in interlock mode, with two different commands to switch them on and off. This way ESPurna will transmit each code several times to ensure the relay has been switched, otherwise it will only transmit it once.
Anyway it's a really cheap solution for home automation and start controlling your assets with MQTT, Alexa, Google Home or a bunch of other solutions.
Overall this is an enabling device. If you are still using 433MHz devices at home, or if you decided to stop using them because, you know, you never find the remote when you need it, now it may be time to make them talk MQTT (somewhat).
"Hacking the Sonoff RF Bridge 433" was first posted on 13 September 2017 by Xose Pérez on tinkerman.cat under Projects and tagged 433 mhz rf, alexa, avidsen, efm8bb1, esp8266, esp8285, espressif, espurna, ewelink, google assistant, google home, home assistant, itead studio, manchester encoing, mqtt, node-red, noru, rest, silabs, slampher, sonoff, sonoff rf, syn470r.