ESP8266 Multi-relay boards: Sonoff Dual and Electrodragon
November was a busy month and the Sonoff Dual that IteadStudio kindly sent me to review was bored in a box waiting for some free time. But it was just fair that another board that has been waiting in the boards-to-review box for longer had it's chance to have some fresh air too. So here we have the Itead Studio Sonoff Dual and the Electrodragon ESP Relay Board face to face.
Face to face
They are both two relay boards with an Espressif ESP8266 controller. They are both powered from mains and programmable. The both have a similar size. They might look alike but they are actually quite different from the inside.
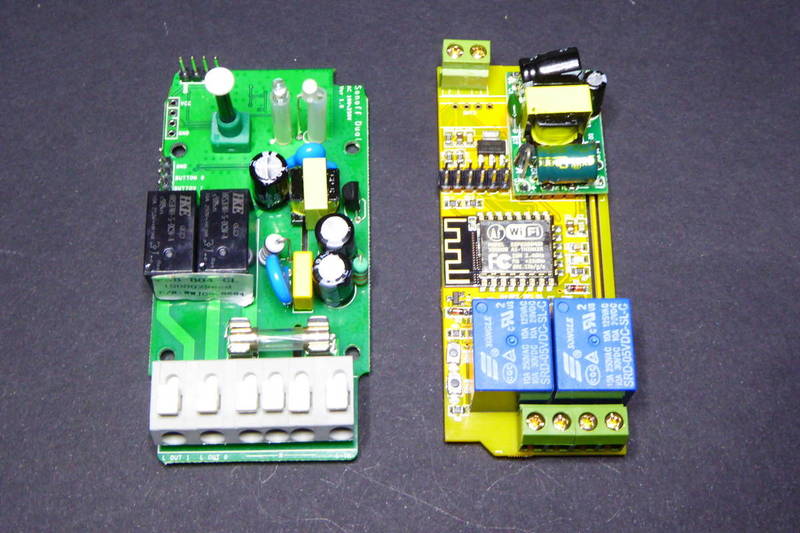
| IteadStudio Sonoff Dual | Electrodragon ESP Relay Board | |
|---|---|---|
| Controller | Bare ESP8266EX | ESP8266 as a ESP12e module |
| Memory | 8Mbit | 32Mbit |
| Antenna | PCB | PCB in module |
| Relays | 2x HKE HRS3FNH-S-DC5V-A 250V 10A | 2x SONGLE SRD-05VDC-SL-C 125-250VAC 10A* (GPIO12 and GPIO13) |
| LEDs | Blue 3mm LED attached to GPIO13 and RG 3mm LED attached to relays (all of them visible from outside the shell) | SMD LEDs attached to the relays and to GPIO16 in inverse logic (none of them visible from outside the shell) |
| Buttons | 1 available from the outside + 2 more in a header | 2 surface buttons not accesible from the outside but also in the header |
| AC/DC | On board | As a module |
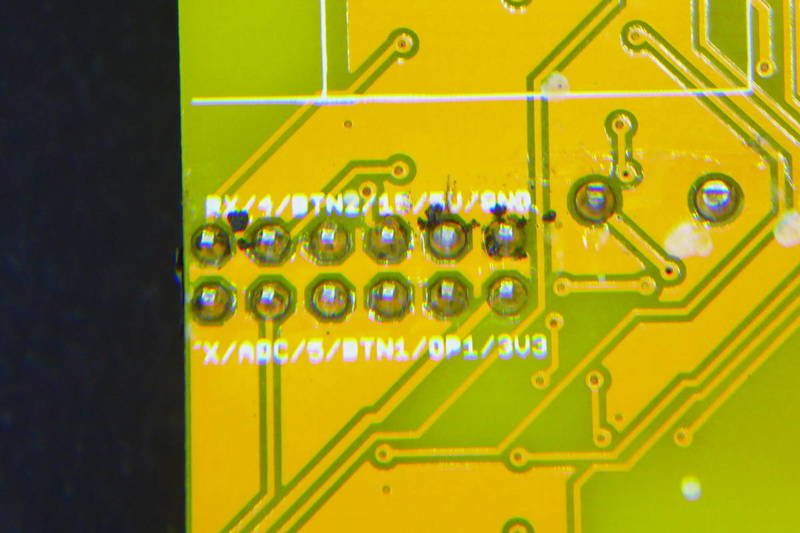
| Accessible ESP8266 GPIO | RX TX 3V3 GND | RX TX ADC GPIO4 GPIO15 3V3 5V GND and GPIO14 in the DHT22 footprint |
*Please note that even thou the Electrodragon has 10A relays the board itself is no way able to handle such currents. The manufacturer recommends a maximum of 1A per line or 2A on a single line.

The Sonoff Dual is a more sturdy and end-user friendly device, it comes with a default firmware that connects to the eWeLink app for Android and iPhone and lets you manage the relays, configure schedules and much more. The Electrodragon on the other side is a hacker's board, with a demo-firmware loaded which does very little.
Anyway I wanted to load my ESPurna firmware on both of them. It might look easy and for the Electrodragon is just a matter of adding support for multiple GPIO driven relays, but not for the Sonoff Dual.
IteadStudio Sonoff Dual
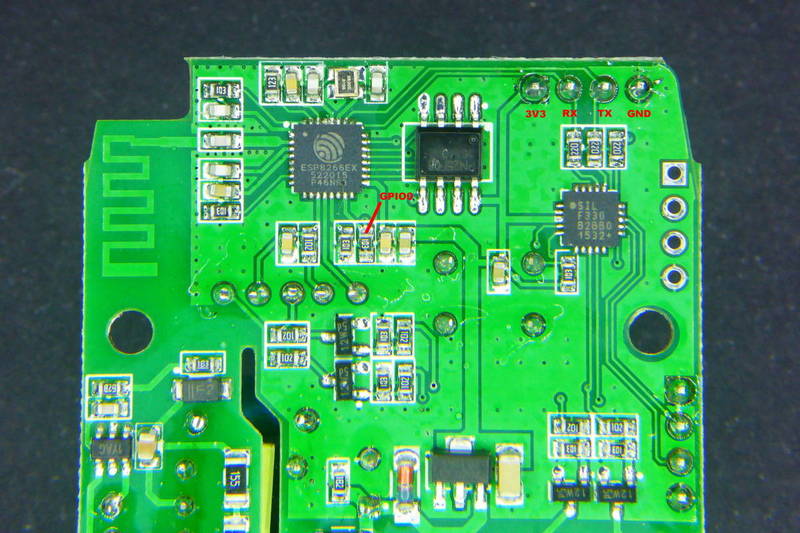
The Dual has 2 LEDs and one button meant to be used/checked from outside the enclosure. But the button is not connected to the ESP8266 (so you cannot use it to set the IC in flash mode, more about this later). The approach IteadStudio have used is pretty much the same they have in their PSB-04 modules: encapsulate the button and relay functionality in a helper microcontroller, a Silicon Labs F330. When a button is pressed the F330 reports the new status of the relays to the ESP8266 through serial. The ESP8266 can also change the relays statuses sending the proper commands to the F330.
The on-board button in the Sonoff Dual reports being button 2. Buttons 0 and 1 are available in a header properly labelled. The protocol has been reverse engineered by Markus Maeder and published in Itead's support pages here. The messages have 4 bytes: starting byte, number of relays, status mask and stop byte.
| Byte | Contents | Values |
|---|---|---|
| 1 | Start byte | 0xA0 |
| 2 | Number of relays | 0x04 |
| 3 | Status binary mask of the relays | 0x00 to 0x0F |
| 4 | Stop byte | 0xA1 |
So if the user presses the on board button (BUTTON2) the F330 will send 0xA00404A1 to the ESP8266 (provided everything was off). Bad news is that the communication is done through the hardware UART interface of the ESP8266 at 19230,8,N,1, so we cannot use it for debugging purposes.
Sonoff Dual support in ESPurna
The ESPurna firmware is released as **free open software **and can be checked out at my Espurna repository on GitHub.
I have added support for the Sonoff Dual to my ESPurna firmware. You can check it out in the repo but I'd like to highlight here the two chunks of code responsible for the communication between the ESP8266 and the F330.
    dualRelayStatus ^= (1 << id);
    Serial.flush();
    Serial.write(0xA0);
    Serial.write(0x04);
    Serial.write(dualRelayStatus);
    Serial.write(0xA1);
    Serial.flush();
The code above toggles the “id” relay (where “id” can be 0 or 1 for the Sonoff Dual) by xor-ing (what?) it in the “dualRelayStatus”, that is the variable that holds the status of the relays as a bit mask. This is from the ESP8266 to the F330. For the other way round we should check for the start and stop bytes:
void buttonLoop() {

    if (Serial.available() >= 4) {

        unsigned char value;
        if (Serial.read() == 0xA0) {
            if (Serial.read() == 0x04) {
                value = Serial.read();
                if (Serial.read() == 0xA1) {

                    // RELAYs and BUTTONs are synchonized in the SIL F330
                    // The on-board BUTTON2 should toggle RELAY0 value
                    // Since we are not passing back RELAY2 value
                    // (in the relayStatus method) it will only be present
                    // here if it has actually been pressed
                    if ((value & 4) == 4) value = value ^ 1;

                    // Otherwise check if any of the other two BUTTONs
                    // (in the header) has been pressent, but we should
                    // ensure that we only toggle one of them to avoid
                    // the synchronization going mad
                    // This loop is generic for any PSB-04 module
                    for (unsigned int i=0; i<relayCount(); i++) {

                        bool status = (value & (1 << i)) > 0;

                        // relayStatus returns true if the status has changed
                        if (relayStatus(i, status)) break;

                    }

                }
            }
        }

    }

}
Note some things in the code above. First we check for the message format (lines 23 to 26). Second we expect just one button to be pressed at a time so we break after a relay has changed it status (line 45). And third we intercept button2 presses and map them to button0 (line 33). So the external button toggles relay 0. Right now this is hardcoded, change it to “value = value ^ 2” to toggle relay 1 instead.
The relayStatus method does quite a few things: checks if the status has changed (returns true if so), sends the message back to the F330, synchronises other devices (more about it in a minute) and sends notifications to MQTT and websocket clients.
Flash the Sonoff Dual
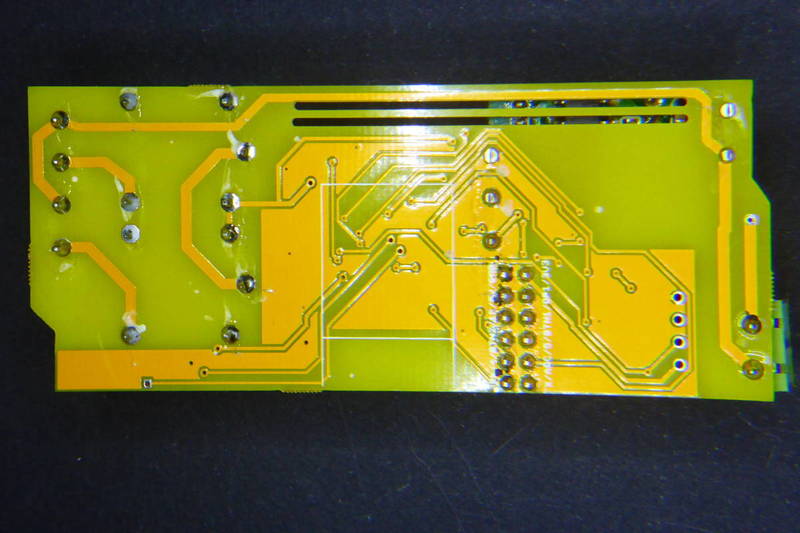
Since the button is not connected to the ESP8266 GPIO0 flashing the Sonoff Dual is a bit trickier than doing the same on the TH or POW. My recommendation is to shortcut an exposed pad connected to GPIO for the first flash and then use OTA to upload the filesystem or update the firmware.
In the picture below you have a line pointing a resistor pad connected to GPIO0. Use a jumper cable to short it to ground while powering the board to get into flash mode.
Electrodragon ESP Relay Board
The Electrodragon board is relatively simple to use. It's a board meant for developers, not for end-users. The relays are directly connected to GPIO12 and GPIO13 so it's just a matter of handling different GPIOs in the code. I use a vector to store all defined relay pins and then directly drive them with digitalWrite method.
std::vector<unsigned char> _relays;
#ifdef RELAY1_PIN
    _relays.push_back(RELAY1_PIN);
#endif
#ifdef RELAY2_PIN
    _relays.push_back(RELAY2_PIN);
#endif
#ifdef RELAY3_PIN
    _relays.push_back(RELAY3_PIN);
#endif
#ifdef RELAY4_PIN
    _relays.push_back(RELAY4_PIN);
#endif
digitalWrite(_relays[id], status);
To flash the Electrodragon note the pinout in the picture bellow. Power the device through the 5V pin. The RX marked pin should go to your programmer TX pin and the TX to the RX. Use the button labelled BTN2 to get into flashing mode. I've have better results holding it down while powering the board and until the firmware has started flashing.

Synchronising relays
If you have 2 relays you can control 2 appliances. Easy. But you can also do some other things like synchronising them. The ESPurna firmware supports 4 options:
- No synchronisation
- All off or at most one on (so if you turn one on all the other will go off)
- One and only one on (so if you turn one on all the other will go off, but if you turn that one off again the next in the line will go on)
- All the same (turn one on and all will go on, turn one off and all will go off)
Let me stop in the “one and only one on” since this this allows for multi-way switching, which is something I've been after since the first Sonoff.
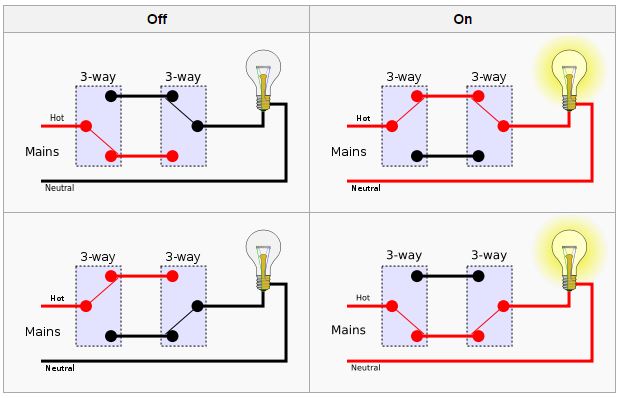
This is a quite common way of switch where yo can toggle your lights from different switches in the room. A 3-way switch (like the one in the graphic) is usually implemented with a SPDT relay with exposed NO and NC terminals. But you can also use two relays with inverse sinchonisation, like the “one and only one on” mode does.
ESPurna 1.1.0
The ESPurna firmware is released as **free open software **and can be checked out at my Espurna repository on GitHub.
The firmware has been updated to support the Sonoff Dual and all the GPIO-based multi-relay boards out there, in particular the Electrodragon ESP Relay Board. This means a lot of changes:
- MQTT topics for each relay (i.e. /test/dual/relay/0)
- API entry points for each relay (i.e. PUT or GET /api/relay/0)
- API entry point to get all relays (GET /relay)
- Each relay is exposed as a different WeMo device
- Different relay synchronisation options
I have also removed deprecated API entry points so all API requests go trough the /api namespace and require and API key.
I plan to add more API entry points to retrieve sensor values and a “pulse” mode for the relays so they can auto off after a second.
"ESP8266 Multi-relay boards: Sonoff Dual and Electrodragon" was first posted on 07 December 2016 by Xose Pérez on tinkerman.cat under Analysis, Code, Projects and tagged electrodragon, esp8266, espurna, itead, relay, sonoff, sonoff dual.